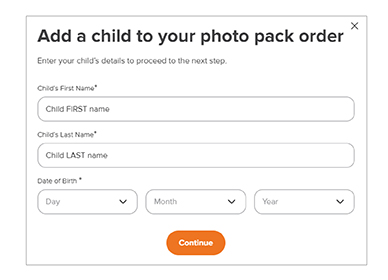
Add a child to your photo pack order
Enter your child’s details to proceed to the next step.
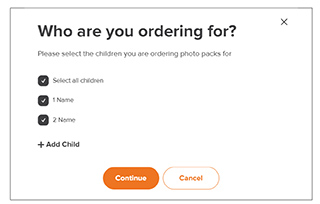
Who are you ordering for?
Please select the children you are ordering photo packs for
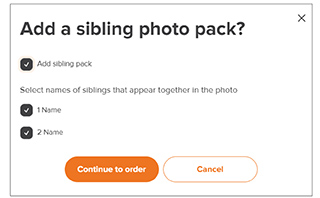
Add a sibling photo pack?
Exit order?
Exiting your order now will clear all your selections. Do you want to continue ordering or clear your cart and exit?
Select the booking
This school has multiple photo days. Please choose which booking you are ordering for.
advancedlife How to Guide
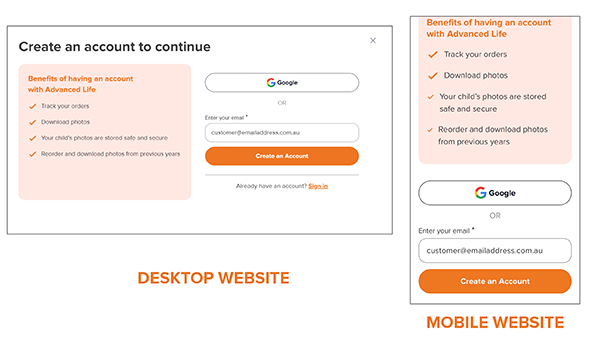
Take advantage of all account benefits, like tracking orders, downloading photos, and securely storing your child's photos.
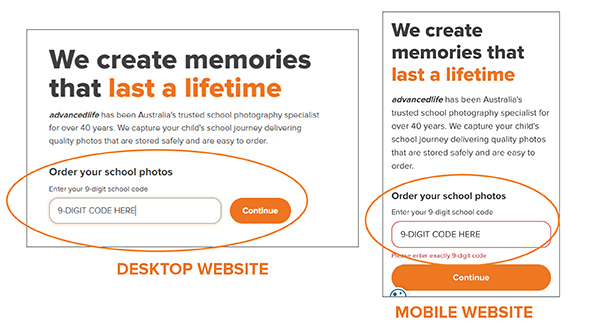
Step 1: Go to www.advancedlife.com.au
Step 2: Locate the 9-digit school code on your school newsletter, order email or order envelope.
Step 3: Enter your 9-digit school code in the provided box and click Continue.
Step 4: In the account creation window, enter your email address and click Create an Account.
Step 5: Enter your First Name, Last Name, and choose a password or if Google select your Google account.
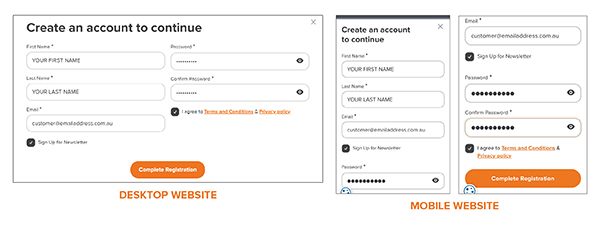
Step 6: Agree to the Terms and Conditions & Privacy Policy, then select Complete Registration. You can also subscribe to our discounts and marketing offers.
Next steps:
Add a Child to your photo pack order
Proceed to creating a package order
If you prefer not to create an account, you can easily place an order as a guest.
Step 1: Go to www.advancedlife.com.au
Step 2: Locate the 9-digit school code on your school newsletter, order email or order envelope.
Step 3: Enter your 9-digit school code.
Step 4: On the pop-up window, select Continue as Guest (located at the bottom). You will then be prompted to add the child you are ordering for.
Next steps:
Add a child to your photo pack order.
Proceed to package order
Step 1: Enter your child’s name as it appears on your photo package. *Schools can use legal name or preferred name.
Step 2: As indicated, add either your child’s D.O.B. or Student ID to authenticate your student details.
Please note: The required method has been selected by your school.
Option 1: Add a child with Date of Birth
Enter the Child’s First Name, Last Name, and Date of Birth. (Please double-check correct spelling and dates). Select continue.
Option 2: Add a child with Student ID
Enter the Child’s First Name, Last Name, and Student ID. Select Continue.
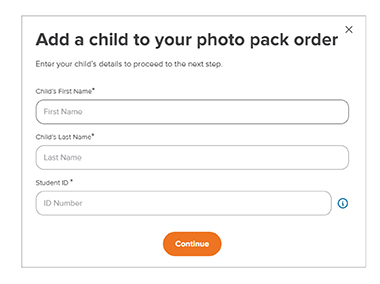
Tip: The student ID can usually be found on school admin products such as student school logins, ID cards, or reports.
To add another child, simply click + Add Child and repeat the process. Click Continue when done.
Once you have either signed in and created an account (either email or google) or as a guest, then added your child(ren), you will see a pop-up window to select which child(ren) to order with your package.
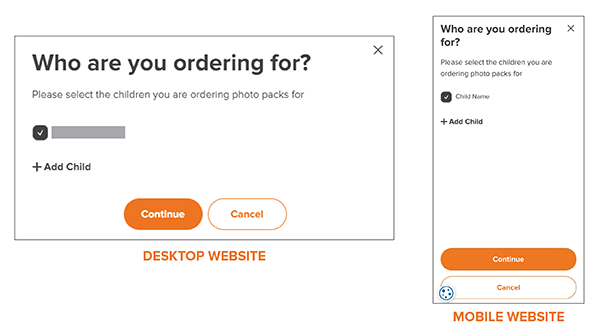
Step 1: Select the child you are ordering for. To add another Child, please click on “+ Add Child” and repeat the previous steps again for each additional child.
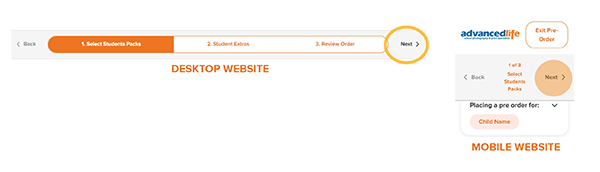
Click the Continue button to begin ordering your current year photo package.
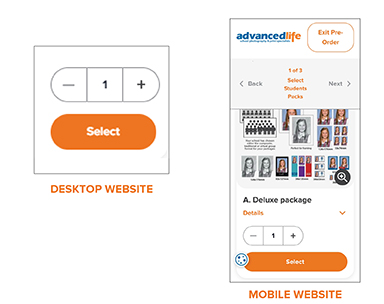
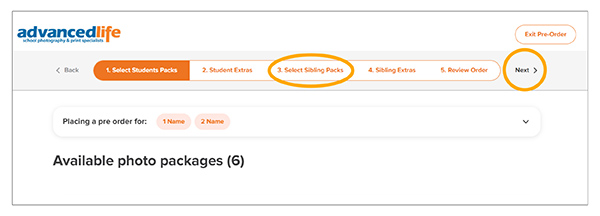
Step 2: You are now taken to the pre-order shopping area. Note you are placing a pre order for “your child”. Select the available package of your choice from the options.

Once chosen, add to your shopping cart by clicking on the select button with your chosen quantity.
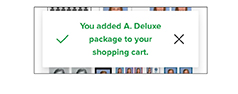
A pop-up window will appear temporarily to let you know your item is added to cart.
Click next in the top order bar to proceed to Student Extras
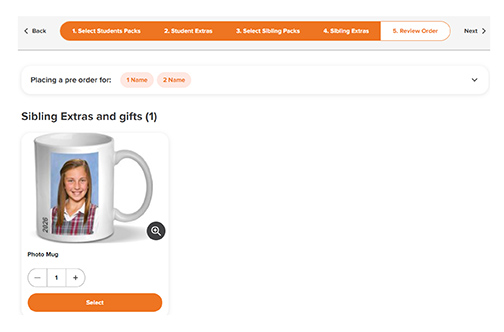
Step 3: You are now in the extras & gifts section. Go to any gift item and adjust the quantity you wish, then click the item’s select button. This will add to cart.
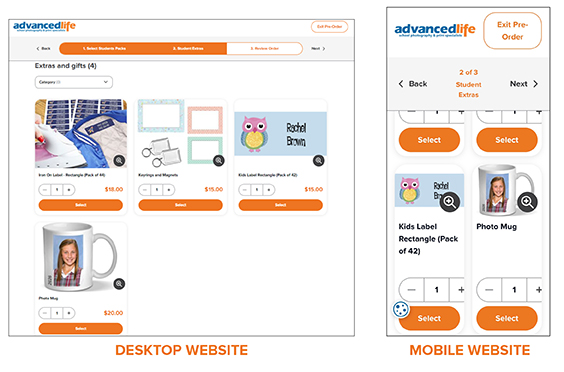
Once done, click next in the top order bar to proceed to review order
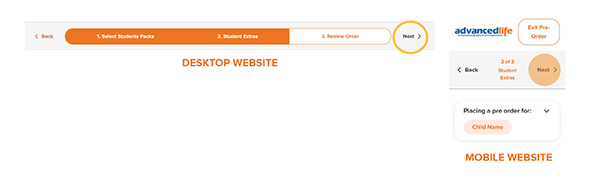
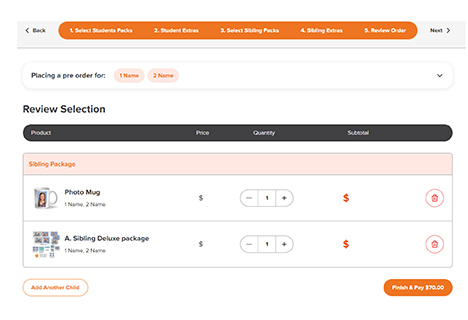
Step 4: Review your order. You can add or delete, go back or confirm your selections here. You can also add another child at this point by clicking the “Add Another Child” button underneath your product review window.
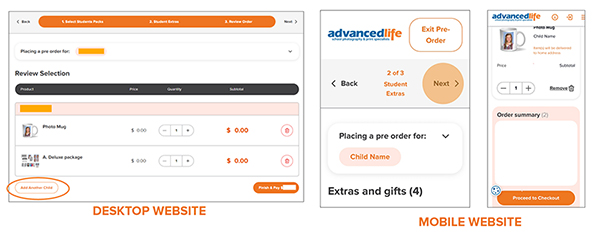
Once you have confirmed the items for your shopping cart, click Finish & Pay.
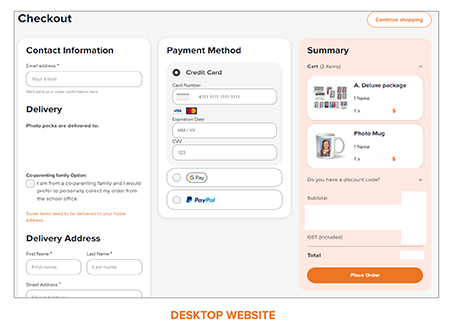
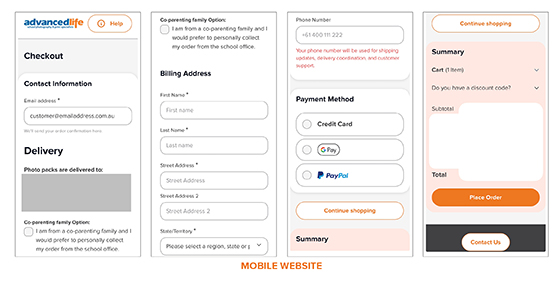
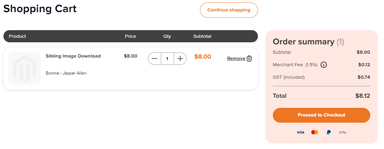
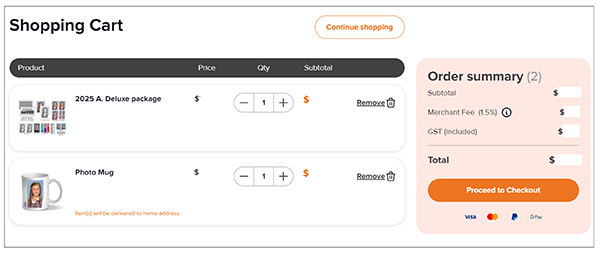
Step 5: Check the shopping cart items and the order summary details, then click on the button Proceed to Checkout to make payment.

Please note the gift items that will be delivered to your home address.
Step 6: You will be taken to the checkout.
• Enter prompted details. The address is for Billing address information or any gift deliveries to your home.
• You can also choose to collect your photo packs from the school office by clicking the Co-Parenting checkbox.
• The phone number is for your delivery tracking and updates. 04xx xxx xxx or +614xx xxx xxx are both accepted.
• Enter Payment Method and details securely
• Then select Place Order
NB: All pre-order photo packages will be delivered to your school.
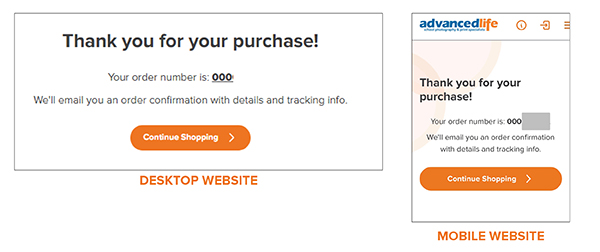
Step 7: You will receive a notice that your order process has been completed.

Step 8: You will then be redirected to your order number reference. You will also be emailed with the receipt and details of your order for reference.
When you have an account, you will need to verify each child that you add using the Secure Image Code (SIC). Once validated, you can preview and download their images.
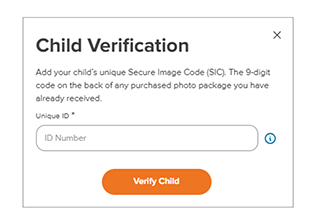
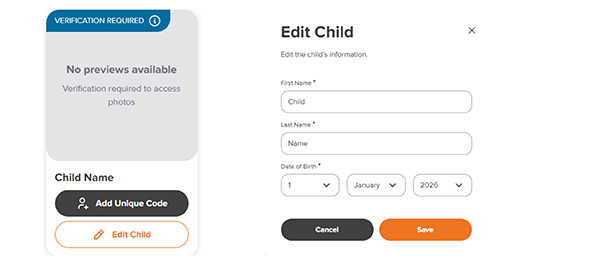
Step 1: Click on My Account, navigate to your unverified child and click on the Add Unique Code button.
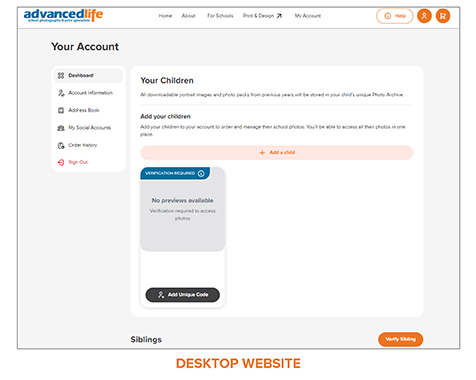
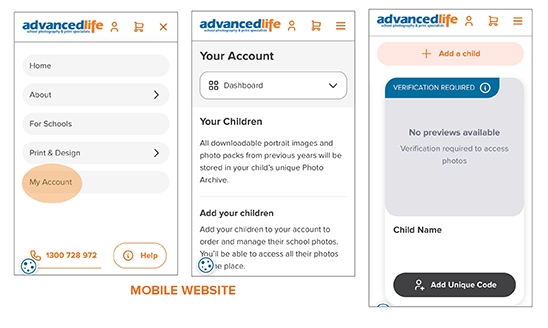
Step 2: Enter the child’s unique 9-digit Secure Image Code (SIC). This code is found on the photo package you have already received.
Step 3: Once verified, their image will appear in the preview box with a verified flag.

NB: If the verification code doesn’t work, please select “+ Add Child” to start a new profile and double check correct spelling of Name and Date of Birth or the ID Number.
TIP: Refer to the name as it appears on your photo package. Schools can use legal name or preferred name. It will be as spelt on your package or a package from a previous year.
NB: If you click View and Re-order Photos. You will then see all available images for that child, including portraits and groups.
Did you know? You can also preview and order previous years’ photos going back 6 years in My Account.
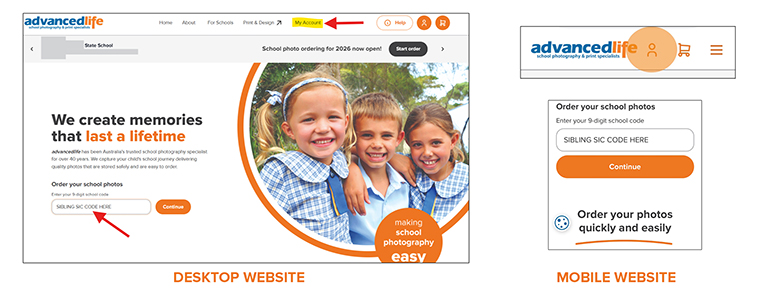
Once you’re logged in to your account, you’ll need to verify your sibling image using the Sibling Secure Image Code (SIC) found on your sibling photo packs. After verification, you’ll be able to preview and download the sibling image in My Account.
You can verify sibling images in two places:
Option 1: From the homepage when already logged in.
While already logged in to My Account, navigate to the homepage then by enter the sibling SIC 9-digit code.
Option 2: In My Account, by scrolling down below your child/children section to the sibling section.
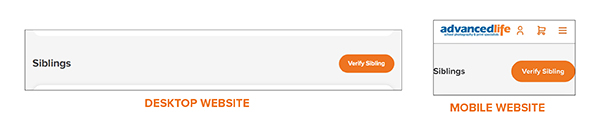
Step 1: Enter the 9-digit sibling Secure Image Code (SIC).
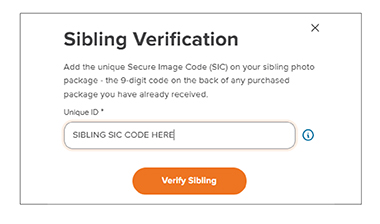
Step 2: Once verified, the sibling image will appear in the Sibling section.
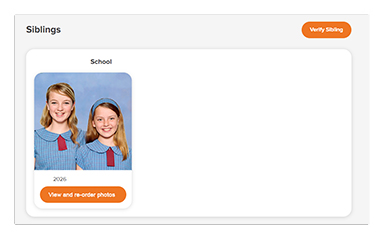
Step 3: Click the view and re-order photos button below your verified sibling image to see all of your available images.
Step 4: You can download any available sibling photos by clicking the download Image button and dowloading to your device.
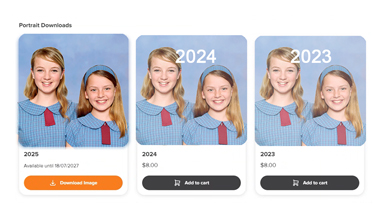
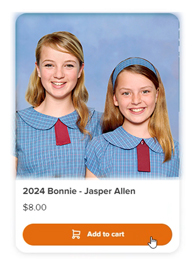
You can purchase previous years' sibling photos by clicking "Add to cart". Once purchased, you will recieve an email confirming that your sibling image is ready for download.
Did you know? You can also verify different sibling photos using each year's unique sibling SIC code going back 6 years in My Account.
Your child’s images are located within the secure My Account section of the website, and will be available to you when you have made an account (My Account) and once your child has been individually verified and linked to your account.
To access these images for purchase or download, please follow the below short steps:
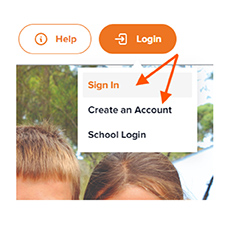
Step 1: Sign in to My Account, or Create an Account by clicking on the login button at the top right of the website. Select login on the webpage and follow the prompts.
Need help? Refer to how to guide
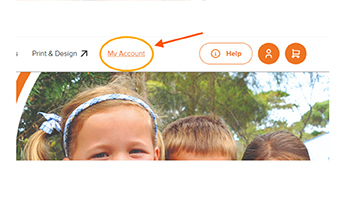
Step 2: Once logged in, click on My Account (from the homepage).
Step 3: Next click +Add a Child
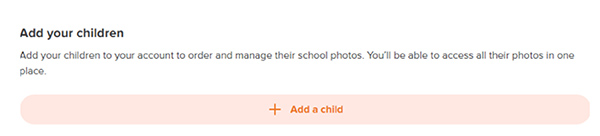
Need help? Refer to how to guide
Enter the 9-digit school code. Follow the prompts to enter your child details, checking that the name is spelt as it is on your photo pack that you received. Enter correct date of birth or student ID as prompted.
Step 4: Verify your child (currently greyed image) - by clicking Add Unique Code and entering the unique 9-digit SIC code on your photo pack. If this doesn’t verify, click Edit Child, to review the name and DOB/Student ID information and check it is correct.
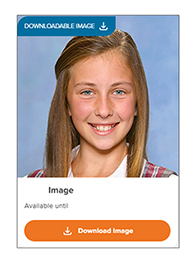
Step 5: Once verified, your portrait image will appear.
Step 6: Select view and re-order to access your portrait image under your child profile.

Step 7: Scroll down to your child image. Your current year portrait will be available for download. Click Download Image under portrait to download your portrait image directly to your device.
NB: Any previous years can be added to your shopping cart for purchase prior to downloading. If you have not purchased an A-E package you will need to purchase the image before you can download.
To order previous years’ photo packages, go to your child in My Account, then click on View and re-order photos.
Step 1: Scroll down under the child images to the order printed products section. You will see all previous years available to you.
Step 2: Navigate to the previous year package you wish to re-order and select you Package Type in the drop-down menu for that year.
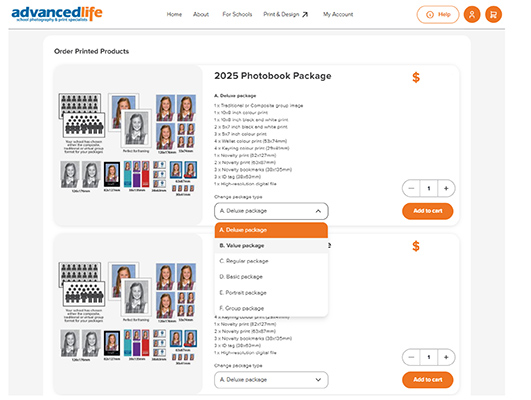
Step 3: Once the package type has been chosen, click on Add to cart.
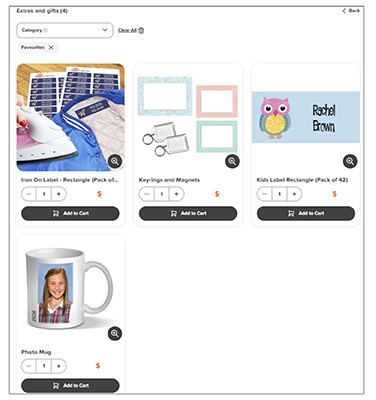
Step 4: Scroll down further to add a gift. Click on Shop gifts.

Step 5: Select your gift to add to cart.
Step 6: One you have added items to your re-order, go to your shopping cart by clicking the shopping cart icon in the top menu bar.

Step 7: Review shopping cart and Proceed to Checkout.
Step 8: Continue through and complete payment details and order.
To order siblings only, the starting process is the same as placing an order. The sibling pack options will be available to you in the process automatically if you have 2 or more children added to the order at the start.
Step 1: From the homepage, enter the 9-digit school code.
Step 2: Add your 2 or more children, entering their details as prompted. Click Continue when done.
Step 3: Check the tick box to Add sibling pack and check the added children you want in the sibling photo. Click Continue to order when done.
Step 4: Now in the pre-order process, you can go straight to the sibling section (3. Select sibling packs) if you are not purchasing portrait packs, by clicking next.
Step 5: Select your available Sibling photo package. This will add to cart, then click next.

Step 6: Select your sibling gift and/or click next.
Step 7: Review order and progress to payment and checkout.
Log in
Sign in with your social account
Create an account to continue
Benefits of having an account with advancedlife
Track your orders
Download photos
Your child’s photos are stored safe and secure
Reorder and download photos from previous years
Sign in with your social account
Already have an account? Sign in
Continue as guest
Password Reset